
Last year, I reviewed the Blackburn Flea headlight. I recently got the tail light, complete with the new USB charger and solar power adapter, too. Again, there's good money to be saved buying this one online. The bike shops sell it at MSRP.
You can see the whole Blackburn USB/Solar Flea review over on BikeCommuters.com. Bonus: the solar panel can (slowly) charge my phone, too.
That will make my bike camping adventures a little more luxurious, I suppose. Who's ready for the next S24O? I know am!
Showing posts with label reviews. Show all posts
Showing posts with label reviews. Show all posts
Friday, March 26, 2010
Blackburn USB/Solar Flea Review


Wednesday, January 20, 2010
Waving goodbye to the Swobo Baxter
My review period is up, so I'm packing Bax up and sending him back to his native (and warmer) California. Be sure to check out my review on BikeCommuters.com

Wednesday, November 18, 2009
FlashBak safety light
I've been using this since about the beginning of November. It can clip to a jersey, backpack, pannier or whatever.
Here's a video. Yeah. It's kind of bright.
Check out my full review on BikeCommuters.com.

Friday, August 14, 2009
Product Review: Axiom LaSalle Panniers
I bought my Axiom LaSalle panniers in May 2008, after having recurrent bad luck with my Banjo Brothers Saddlebag panniers, requiring re-stitching of seams on a regular basis.
I paid $99.99 for these from a local bike shop in downtown Kansas City, MO. They're now going for $119.99 from the same shop, but they can be found online for less than $90 and upwards of $120 depending on where you're looking. This is quite a bit of flux in pricing. Shop around. It might be worth your while to buy these online if shipping prices are reasonable. At this point, you may be asking if these could possibly be worth $100. That's a good chunk of cash for some of us. I'll answer that at the end. For now, let's take a gander at the panniers themselves and what comes with them.
Features:

- Cavernous 40 Liter capacity (2440 cubic inches)
- Compression strap system adjusts for variable load sizes
- Outer zipper pocket on side, mesh pocket on back for easy access
- Adjustable shock cord webbing on top for extra storage
- Adjustable bungee-attached hook for quick installation and removal
- Reflective piping on seams
- Rugged, rubberized bottom panels
- Lock-down toggle to secure panniers to your rack rails
Accessories Included:
- Extra hardware (mounting brackets, bolts, nuts, Lock-down toggle)
- Shoulder strap
- Two rain covers (with included zipper storage on the top flap)
Pros
With more than a year of all-seasons abuse, I've rarely felt let-down by the LaSalle panniers. For the utility cyclist and commuter that carries a load, these are a great balance of form, function and price. With occasional re-treating, the bags alone will repel light rain for about 10 minutes before it begins permeating the seams. The rain covers add about 15 more minutes to this process. The rain covers tuck away nicely into a zipper pouch within the top flap. This area is also a nice place to stash other small, thin, or rarely-used items. I keep an emergency poncho in one and some CitraWipes in the other.

Since the drawstring-closure area at the top adds a few extra inches of capacity, each bag can carry a nearly-full paper grocery sack and still manage to snap closed over the top of it, although the taper at the bottom clearly separates the LaSalle from being a bona-fide "grocery pannier" which is okay for me, as the taper means that I don't smack the bags with my foot every pedal rotation.

The mesh rear pockets are the perfect size to carry extra water bottles for touring or long, summer rides but they easily hold other things you may want easy access to. The side zipper pockets are great for things like your house keys, wallet, and phone, but they can be difficult to get into without opening the main flap if you have the compression straps pulled down tightly.
The adjustable shock cord tie-downs on the top of the panniers are good for carrying a rolled-up jacket or anything else that can be tied town: like eggs, so they don't get crushed.

On back: adjustable bungee for the rack hook (pull the cord a bit and it will shorten the bungee as shown) and the black plastic toggle keeps the panniers from bouncing off of the rack rail. Note it's mounted off-center to accommodate different styles of racks. The upper mounting brackets are covered in rubber, supposedly to keep the bags from marring the rack, or maybe to keep them from sliding around much. This rubber got torn up the first few times I used the panniers, but there's still some of it there. Also visible, the handle on top. They snap together to make them a bit easier to carry around. Both bags have plastic loops on back to latch the shoulder-strap to. Only one shoulder strap is included. I'm not sure why.

Cons
In a heavy downpour, or riding through frequent deep puddles, there will inevitably be water flooding the lower part of the panniers within just a few minutes. The rain covers don't seem to help much, either, as they, too, help trap the water. Although there's a brass "drain" grommet at the base of the vibrant yellow rain covers, water manages to pool in them. If carrying sensitive stuff (good work clothes, electronics, etc) in heavy rain, you will most definitely want to make sure to place them into a water-resistant or waterproof container before they go in the panniers. Double-bagging things in plastic grocery sacks is usually sufficient for my needs.
Like almost all panniers, the LaSalle has a tendency to lurk eerily close to the wheel's spokes. This isn't so much a flaw with panniers, but I'd recommend a rack with some extra rear-support like the SunLite rack I have, the Tubus Cargo, or Topeak OS.
The long compression straps are nice because they allow you to cram an insane amount of stuff into each bag. When you don't need all that room, though, the straps tend to flail around. They look messy and I fear that they'll get pulled into the chain sometimes. To clean them up, I cut small rubber-bands from an old inner tube and used them to tame the straps.

Also, the QR skewers on both my mountain bike and road bike often dig into the bottom of the pannier on the non-drive side, especially during removal. For those with adjustable racks, this might be avoidable or may be a non-issue entirely. My non-drive-side pannier has gotten a little torn up on the bottom, though, where the skewer has rubbed away parts of the thick rubber covering. Note: you can see how much room these panniers have in this photo. I stuffed it full to take this photo.

In closing
Axiom sells an entire line of smaller waterproof panniers such as the Typhoon and Monsoon models, so if you commute in wet climates often, take a look at those. According to friends of mine, they work well enough, but I don't know anyone who's put a whole year of daily use on them to really put the "waterproof" claims to the test once regular wear-and-tear gets involved. I personally wouldn't mind a set to use ONLY during the wet seasons.
Regardless, the LaSalle seemed like the more appropriate choice for my daily, year-round commute and errands due to its size and price. Overall, the workmanship and construction of these bags seems very good. In over a year, they are only showing minimal wear down where the QR skewers have caused some damage. I have seen similar Axiom panniers (not sure of the model, but all part of the Journey Series) in use by other commuters and tourers and they're still going strong after several years of use. I'd definitely buy these again, if I had a chance. I'm just not sure I'd pay the full $120 MSRP for the privilege with cheaper options available.
Monday, July 06, 2009
Product Review: Blackburn Flea
I picked up a Blackburn Flea headlight last week. My halogen only lasts about an hour, and with some more night riding coming up soon, I felt like it'd be best to snag a "to be seen" light that has at least a 2 hour run time to supplement my big "to see with" light.
The lights themselves are lightweight and small. Unlike other smallish lights (such as the "hipster cyst" Knog Frog), they're also rechargeable. In the cycling world, that all adds up and usually means that MSRP is somewhere in the $ARMLEG range.
The Blackburn Flea can be purchased as just the headlight or tail light, with a slight discount offered for buying them both at once. I bought only the front light, as I really don't need the rear one. MSRP for each is $29.99. As you can see from the Amazon embed to the left, it's considerably cheaper to just buy it online for about $22. Strangely, it's also cheaper to buy the Flea Front and Rear separately -- About $44 total -- than it is to buy the Flea Combo which even via Amazon commands the full MSRP of $54.99
The Flea lights mount with velcro straps (included). The front light has a plastic track to hold it to the velcro, while the rear light uses a metal clip (which can be used to attach it to a belt, wedge pack or helmet strap. Either way, these lights attach easily to many places on a bicycle. I opted to be boring and put it on my handlebar.
Both front and rear offer 3 different light patterns. The headlight has low, high and strobe while the rear offers steady, flashing and sweeping modes. On high and flash modes, the headlight puts out about 40 lumens. This is enough to see a small patch in front of your wheel or enough to look down at your cyclo-computer. I feel it's better suited as an attention-grabber to alert motorists of your presence in low-light conditions. I don't think I'd want to depend on this light to see the road. Both lights have LEDs with both a narrow spot and a wide peripheral ring (as shown below). I won't bother much with a front-beam shot, as it would be mostly unimpressive. It throws light in front of you and will make your presence on the road known -- especially when you've got it strobing.
The unique part is the charger. Unfortunately, even if you get the combo, you only get one charger (as far as I could tell by looking at the package). This pretty much negates the $5 you save by buying them together at the local bike shop. The charger has wires wrapped around it and fits inside a small rubber case. The whole assembly easily fits on a keychain.
To charge, you un-wrap the wires and let the magnetic contacts adhere themselves to any 1.2-1.5V battery, while snapping the charger to the underside of the Flea light. A large D cell should yield more than a dozen charges. I just use rechargeable AA cells. The LEDs flash while charging and stop once the internal battery has fully charged.
Expect 3-6 hours of run-time from the headlight (Supposedly, flashing mode is the most efficient) and 6-12 out of the tail.
Overall impression: I wouldn't pay full retail for these, but for about $22, it's a handy supplemental light for those times you'll be riding under the streetlights and don't need help seeing the road, you just want to be seen. I'd rank it right up there among my favorite (relatively) inexpensive bike commuting gadgets. Its tiny size, modest run-time and clever charging mechanism won my geeky heart over. I'm just not sure I'd be willing to pay $30 each for them.
Related:
Product Reviews
Tricks of the Trade


Thursday, July 02, 2009
Short week
Many financial companies are closed tomorrow, mine included. This is in observation of Blow Stuff Up Day err... Independence Day. But I won't be blowing anything up until Saturday.
Last week, the sweltering climes hinted of August more than a month early. This week, it feels like May in July and the bikes have been out out in full force.
I wandered to the grocery store to pick up my lunch yesterday and saw another one of those strange single-sided fork bikes locked up outside. It's a Cannondale F29. Not sure how practical an expensive cross-country 29er is for getting around KC for errands, but it beats a car, I suppose. As one friend of mine pointed out, it will tackle the pot-holes and steel plates with ease. And we do have plenty of those around here.
On my way back from grabbing lunch, I stopped by the fountains next to Barney Allis Plaza.
While there, I took some pictures for my review of the Ryders sunglasses I got last week. After a week of testing, I've got to say I like them a lot.
Grandstand Burgers. I met my wife there, but just got a snack as I had a late lunch. If you're in the area and like burgers, this little gem north of I-35 on Antioch (at Merriam Drive) serves the best I've had in KC.
A nice, relaxing swim put an end to another perfect summer day.
With that, I'll probably be silent until sometime next week. I'll be sure to take plenty of pictures of explosions.


Wednesday, September 24, 2008
Product Review: SKS Commuter Fenders

The SKS Commuter is supposedly a full-wrap fender, but as you can see to the left, it covers about 40% of the rear, leaving plenty of room to throw a sizable rooster-tail onto whoever happens to be riding behind you. As I'm pretty slow, no one's usually behind me so that's not too much of a problem. The rear fender does keep you from getting a butt-stripe, and the front fender keeps your feet pretty dry through all but the deepest puddles.
About a month ago, you may recall I did some rather unsavory, hackish repair work to a fracture in the rear fender. I examined the fender for other signs of damage and nothing really caught my eye. The initial repair job from August is still holding up great, by the way. I figured that the fracture was from the time it got mangled in May. Now, I'm not so sure.
Yesterday, I noticed some rattling from the rear of the bike and saw that the fender had indeed cracked all the way through right where it attaches to the rear brake caliper. Upon further inspection tonight, it's also about ready to crack all the way through in a third spot.
While they're relatively attractive, moderately priced, functional and come with decent installation hardware/instructions, I can't help but be pretty disappointed that they lasted only six months. I've ridden The Twelve about 2000 miles since I put them on.
In the heat of the summer, my bike was hidden in a somewhat cool parking garage. I never left it locked up in the sun. I can't blame UV degradation or excess heat/light exposure because the only time it was out in the heat was when I was riding it.
Overall: They worked really well while they lasted, but I'm not impressed. I am, however, a believer in fenders now.
Some people I was talking to when I got these fenders expressed a lot of good remarks about the Planet Bike Cascadia fenders -- both in looks and form, with massive mud-flaps that make it less likely you'll rooster-tail riders behind you. I suppose I'll give those a shot when I can afford it. For the time being, I've yanked the fragmented corpse of a rear fender off of my bike.
Thursday, May 29, 2008
Bontrager Hard-Case Tires: The good and the bad
I've been rolling on a hard-case tire for about 8 months on my rear wheel. Constant glass-shard flats and occasional snakebites finally pissed me off enough to swap out the OEM Bontrager Select 25mm tire for something beefier. A Little more than a month ago, my front OEM tire gave out, too. I replaced it with the 25mm Bontrager Race-Lite Hard-Case tire, too.
I haven't flatted once in the rear since I put this tire on. I haven't flatted in the front, either but it's only been a month.
One thing I noticed is that the rear seems to lock up a bit easier than the original tires. They also seemed to have a little bit of squirm to them when cornering hard, but I attributed it to the sidewalls being a bit less compliant.
Today, I put them to the test, unintentionally. I was coming down a steep viaduct and preparing to turn left. The left turn light went green, and I hammered to catch it while it was green. 40 MPH when riding down hill is easy to come by with this bike, and I was going about 40. I went to lean hard like you'd see a racer do, but the bike wanted to slide. I wasn't on the brakes, but I was going to wipe out if I didn't act fast. Not wanting to hit the front brake while it's washing out on the hot pavement, I opted to right myself a bit and hit the rear brake. It locked up instantly and I started skidding again. I counter-steered and feathered the front brake enough to scrub off some speed, but I wasn't going to make the turn. I finally got upright and feathered both brakes again to slow down as much as I could, and then ran head-on into a 4" tall curb between 10 and 15 MPH, doing as much of a bunny hop as I could muster. The front wheel bounced off the curb pretty good. The rear wheel hit hard. I got it shut down before I slid all the way into the concrete streetscape.
That mess narrowly avoided, I'm standing in a flower garden with my front wheel a foot away from a concrete wall. I click out and dismount, fully expecting a mess of mangled rims, broken spokes and pinch-flats.
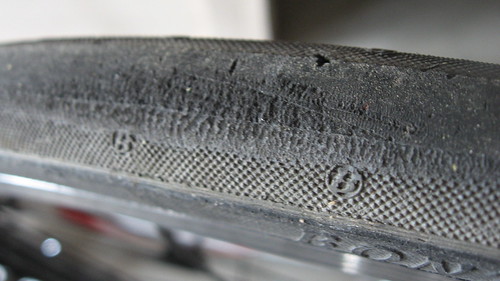
Aside from two hefty skid patches on the rear tire (the worst shown below) and a roughed-up sidewall on the front, only one word describes the condition of my bike's rolling stock: "Unscathed"
I need to make sure the fork didn't take a beating, but I think these Hard-Case tires saved my wheels. They are, indeed, more bullet-proof than originally thought. Having said that, they don't grip nearly as well as my admittedly crappy OEM Bontrager Select tires. These are definitely not for racing.
Thursday, March 27, 2008
As vapid as they come
A stark contrast to yesterday's lively homeward commute, rapid was replaced with vapid. 45 degrees. Piercing crosswinds hard out of the north made the ride seem longer. The stinging precipitation was blurring the line between mist and rain, with water droplets just large enough to carry momentum and just small enough to build up a lot of speed.
It wasn't a bad ride home -- it seldom is. It was just... boring. It was something that was taking up 15 minutes of my time. Sure, combined with the A bus, it wasn't much slower than if I'd have driven home, so it wasn't really setting me back. It was just something I had to do to get home, but better on a bus and on a bike than stuck in a car on the highway. I can relax on the bus and take a quick power nap if I wish. I can clear my mind on my bike. I can't do much of either when I'm driving in bumper-to-bumper traffic dealing with Kansas Citians who suddenly forget how to drive when there's a drop of rain on their windshields.
Not much more to say about that.
According to the forecasts I'm seeing, it looks like we'll be dealing with near-freezing temperatures AND the possibility of rain for my work-bound commute in the morning. Rain and sub-40 temperatures combined. That's one thing that will actually make it hard for me to see the benefit in riding my bike, even to The Maul to catch an express bus. I'll probably do it anyways, but it won't likely be any more fun than I had on my way home this evening. Where's spring? Where's this Global Warming thing we're all so worried about?
Oh, yeah. I posted a review of my Cannondale Doubletrack cycling shorts on Commute By Bike today. Quick note to anyone thinking of writing a product review: Always use the word "investment" in your review if you like the product. That way someone, somewhere, on the Internet will berate you. And you can chortle wildly while drinking a beer and not really caring.
Random Tunage:
Nirvana - Smells Like Teen Spirit
Lars Tindy - Past and Future
Tuesday, March 25, 2008
Product Review - Shimano SH-MT20 shoes
I've had these for more than a year now, so I guess it's as good a time as any to tell you what I think. While I was off the bike for a while last year (after The Face Plant) I bought clipless pedals, a new helmet (the old one was cracked) and these shoes.
Knowing that I wasn't going to be doing a lot of mountain biking, it seemed kind of silly to look at mountain bike shoes, but the more I looked around, the more these appeared to be perfect for my situation. I was facing some longer rides and potential full-commutes (almost 50 Miles round trip at the time) and I was starting to do a lot more utility cycling. I wanted a shoe that would click into my SPD pedals, but would let me walk around the grocery store or coffee shop without sliding around on the cleats or without having to prance all over the place in bright, shiny, slick roadie kicks.
If I had it my way, ALL shoes would use a ratcheting strap system to fasten. It's actually my favorite shoe closure mechanism. Wearing shoes with ratchet straps isn't exactly normal in public, though. I personally can't stand velcro for primary closure on shoes. Shoelaces fall right in between in functionality, but score high marks for looking normal and being easy to replace or repair when worn out. Try repairing ratchet straps or velcro on shoes. Not so easy. Therefore, the SH-MT20's shoelace closure strikes a great balance of utility, functionality and style. Some cycling shoes might earn you a couple of "George Jetson" comments. These? No one will even notice them.
On the road, the Shimano MT20 offers a moderately stiff sole for good foot support, ample ventilation on top, and enough room around the cleat so that you can get good, positive pedal engagement without fumbling around.
On the ground, faint cleat rub can be heard, especially on concrete. You don't lose traction or slide around, though. SPD cleats actually engage on the top part of the cleat, so you can get away with quite a bit of walking around without affecting how the cleats engage. They look much like plain old tennis shoes from the top, and the sole has enough flex in the toe so that you don't need to stomp around flat-footed in order to walk.
These shoes are almost as at home strolling between vendors at the farmer's market as they are when you're hammering out miles getting there. For commuters and utility cyclists that want the flexibility to get off the bike and walk around, need positive pedal engagement, but don't like other methods (toe clips, power grips, etc), these are a great choice. Retail price: about $50.
See Also:
Sunday, January 06, 2008
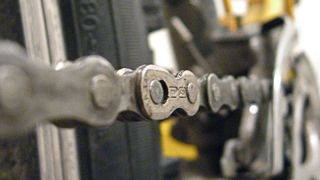
Product Review: SRAM Power Link Chain
Highlights:
- Power Link master link is easy to use
- Makes deep-cleaning your chain a quick and simple task
- Power Link is just as strong as other master link systems (such as pressed pins)
- Requires no tools to remove and install your chain
Thursday, December 20, 2007
Product Review: Headland CMT Seat Pack
I'd been meaning to write a review of this for quite some time, but I keep on forgetting. Today, a reader submitted the following quandary, which finally got my butt into gear (thanks, Alan!):
Noah,The seat pack in question is the Headland CMT (Compression Molding Technique) as seen in my profile photo:
Can you tell me what type of bike seat bag you have on this bike: (link to my profile) I liked the looks of it, and would like to get one for one of my bikes.
Thanks,
Alan
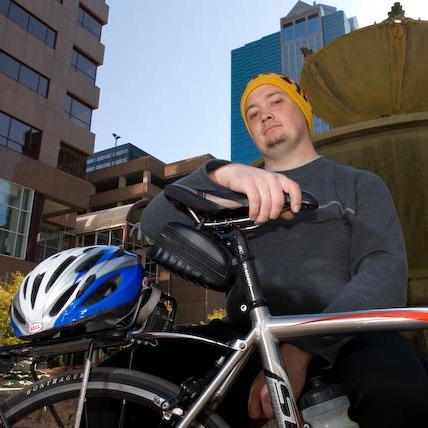
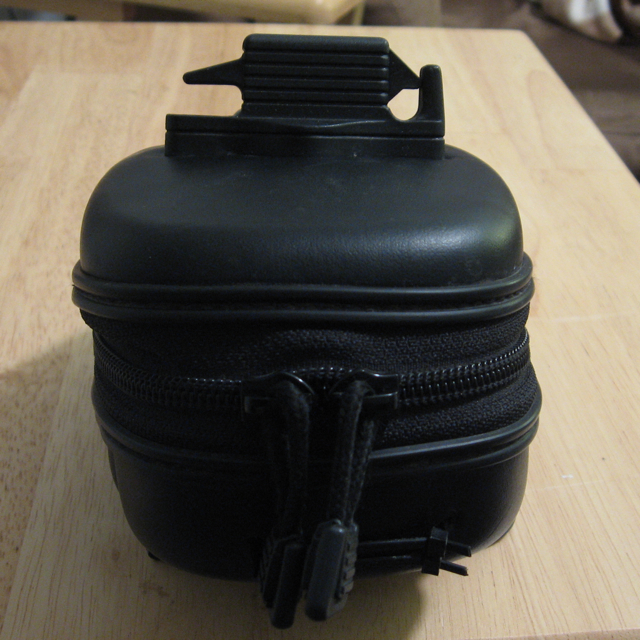
I don't have a better photo of it on my bike, and I can't get a good indoor shot that gives it justice. The one I have is the medium-sized model, which is pretty big for a seat pack -- ample for an urban-assault commuter's flat kit, for example.
Exterior
The Compression Molding Technique results in a rugged, dense foam pack that's got a durable outer rubberized coating. After almost a year of use, the CMT looks as good as new. The outer coating doesn't absorb water, either. While it's not water-proof, what's inside will probably stay dry in all but the most torrential of deluges, barring complete immersion in water.
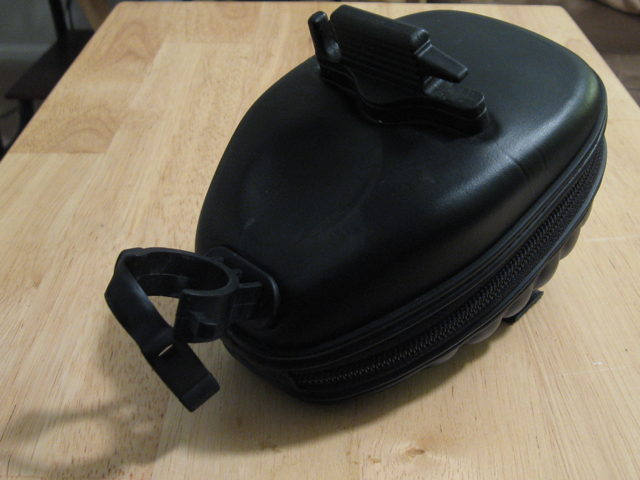
On the back of the pack, a plastic strap is riveted, which can be used to hold a belt-clip tail light. This plastic strap, with my Mars 3.0 blinky, broke off on a group ride. I'm not sure I'd recommend mounting a tail light on the CMT seat pack. I replaced the broken strap with a pair of zip ties, which seem to be working quite nicely.
Attachment
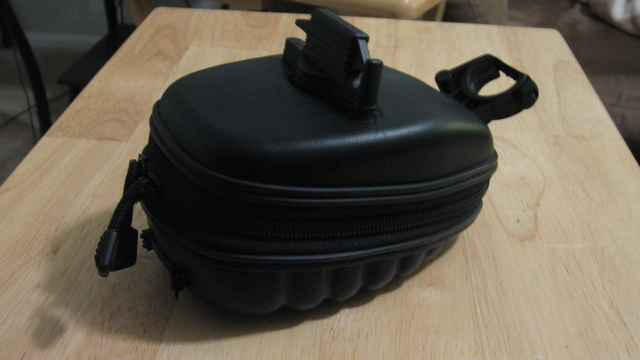
Highland eschews the traditional Velcro rail and seatpost straps for some more intuitive attachment methods. A plastic clip with a rubber strap firmly grasps almost any size of seatpost effectively, while a spring-loaded clip snaps onto the saddle rails. There are other manufacturers using similar methods, but all the other seat packs I own attach with velcro.
Interior
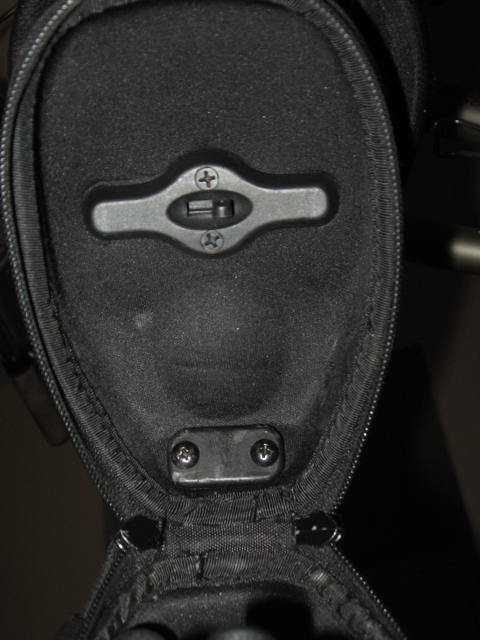
The inside of the CMT is lined with a soft padded fabric, and you can see the release mechanism for the seat rail clip. The CMT comes off in mere seconds, just as easily as installing it. If you're locking up your bike in a high-crime area, this is a benefit, as you can simply take the pack with you.
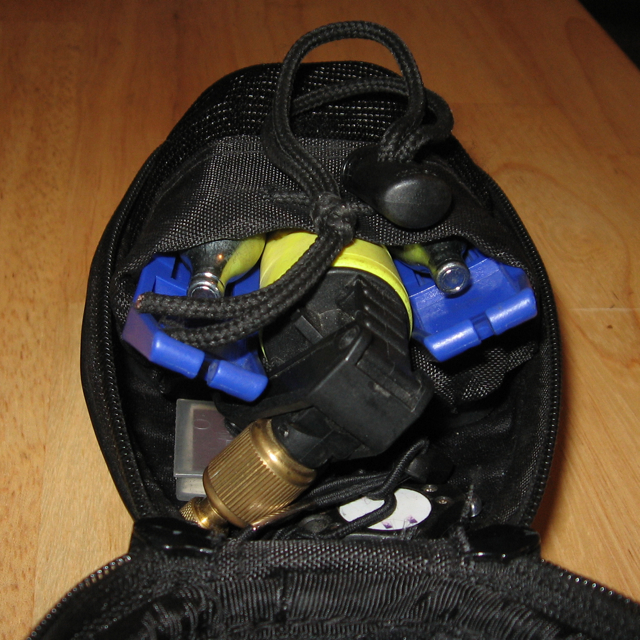
A total perimeter double-zipper and Faux-leather hinge at the front of the pack gives it the ability to open all the way up for easy access to all your goodies:
Capacity
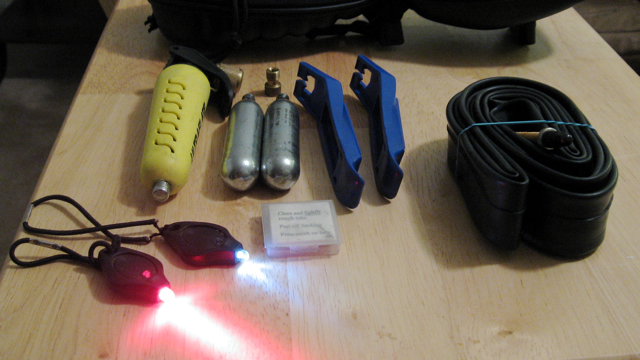
If you carry a lot of goodies like I do, then you'll appreciate the CMT's cavernous payload capacity. I keep my emergency lighting, presta/schrader adapter, CO2 inflater with 3 Cartridges, a spare tube, tire levers and glueless patches inside. There's still room for some spare AA batteries or my Park Tool MTB-3 in there, but I simply don't have the need to carry anything else in my seat pack. Keep in mind, there's another model even larger than this!
See Also:
Tuesday, November 20, 2007
Product Review: Park MTB-3 Rescue Tool
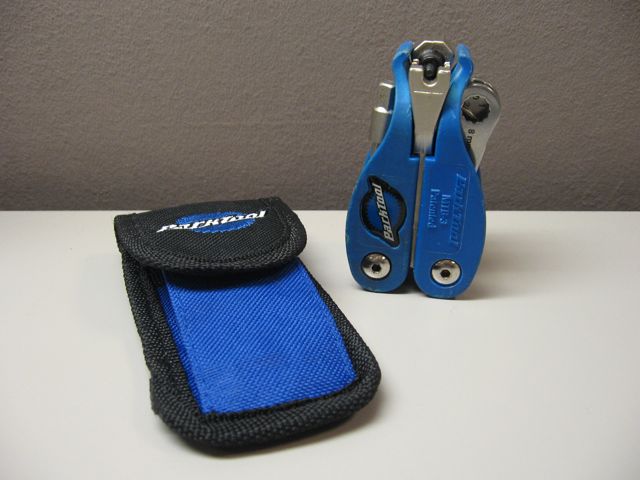
Designed with singletrack trail riders in mind, the MTB-3 is Park Tool's answer to the trials and tribulations of mountain bikers everywhere. As it turns out, it contains pretty much everything I've ever needed to get myself and others out of a bind. I've found that it doesn't matter where I'm riding or what kind of bike I'm on, the Park Tool MTB-3 is always the right tool for the job when I don't have access to my huge box of tools at home.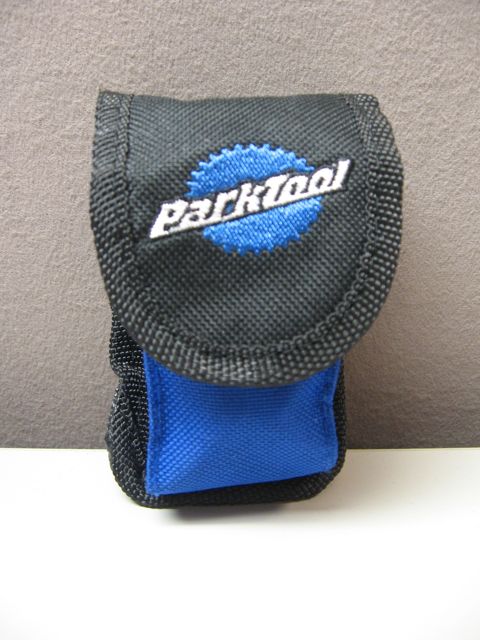
The Park Tool MTB-3 stood proud of offerings from Wrench Force, Crank Brothers, and Blackburn regardless of price, which was often higher than that of the Park Tool MTB-3. Try as I may, I couldn't find a wider variety of tools in one compact package, and never once have I found myself wishing that Park Tool had included just one more thing. I've never needed anything else on the roadside, ever. It comes with a handy, attractive and rugged ballistic woven nylon belt holster, as well. It truly is a toolbox on your hip or in your bag.
Over the course of the last year, I've helped several bicyclists including myself tighten loose pedals, brakes and seatpost clamps. I've turned bikes with destroyed derailleurs into short-chained singlespeeds, I've adjusted shifter stops, re-attached clipless cleats, fixed flat tires and a host of other things, thanks to the Park MTB-3. it doesn't matter if I'm commuting, just taking a nice lonely ride in the country, group riding, or out on the singletrack with buddies: I simply don't leave home on my bike without it. I even used it to crack open a refreshing bottle of Boulevard Wheat after one of my group rides, just so I didn't have to wait for the communal bottle opener to make its rounds.
What, then, does this mysterious tool hold within those sleek blue nylon tire levers-turned handle? There are three snugly-interlocking pieces that nest together. Feast your eyes!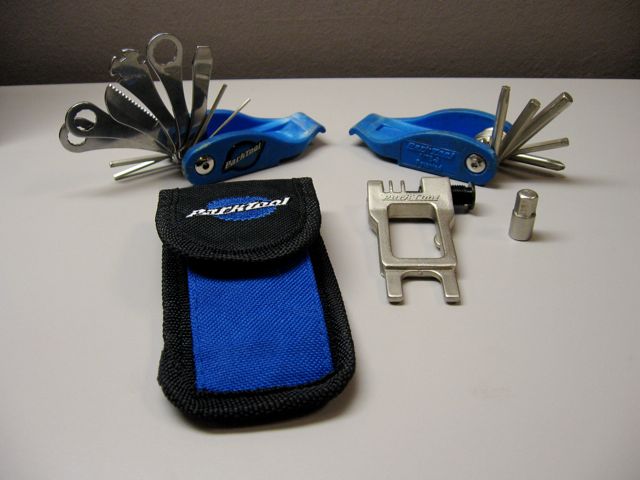
It's pretty obvious from the photos that my MTB-3 has been put through its paces in the last year or so. The handles are stained with chain grease and marred from scores of impromptu bike surgeries. The tools themselves are made of high-quality plated and polished steel, and there's not a scratch on them, nor have they torqued or bent. The nylon handles have bent a little bit from prying off some very stubborn tires, but they still work well both as handles and as tire levers.
I did have one problem while tightening a pedal on one of my group rides a few weeks ago. A minor crack formed in the MTB-3's pedal wrench, and I'm pretty sure I was within torque specs. Park Tool, however, sent me a replacement center section via priority mail with no further questions aside from where to mail it!
If you don't yet have a decent bike-specific multi-tool -- and everyone who relies on their bike for transportation instead of as a weekend toy should -- I strongly recommend the Park Tool MTB-3.
See Also:
Wednesday, November 07, 2007
Product Review: Dinotte 200L LED Headlight
I have been using the DiNotte 200L headlight system daily for a week now. I owe it a proper review.
I picked this item up as a weekend special ($70 discount) from DiNotte. The catch? No rechargeable batteries, no battery charger, and no helmet mount kit were included. I didn't need any of those, so it was worth the savings. Even so, at about $170 with all the above stuff included, this is a great lighting solution for the money.
Package Contents
* DiNotte 200 Lumen LED light engine
* Battery clips (batteries not included with my purchase) (2)
* O-Rings (2)
* Velcro straps (2)
* Canvas battery pocket
* Basic instruction sheet (in the trash by now, I don't believe in instructions)
Mounting
The DiNotte has a unique mounting system that's elegant in its simplicity. Just slip the o-ring around the handlebar (or seatpost for the tail light) and snap it into the groove on the top of the light engine. The o-ring provides holding power that's more reliable than awkward clips or clamps, and a small rubber pad on the underside of the light engine grips the handlebar to keep the light pointed where you aim it.
I was also able to easily mount it to my helmet without any special mounting hardware, but that was only due to the shape and placement of the vents on my Bell Solar:
Using the light
Since I threw out the instructions right from the get-go, it took me about 30 seconds to figure out how this thing works. That's okay, because the instructions would have taken me a minute or two to read.


- Double-click the button to engage the light.
- Hold the button for two seconds to turn the light off.
- Press the button to change brightness (steady mode) or pattern (flash mode).
- Hold the button for six seconds to change between steady and flash mode.
There's a light in the button which normally glows blue. It blinks at different speeds to communicate what brightness level or flash pattern is in use. When the battery pack gets low, the button's back-light will switch to red and the LED will momentarily strobe quickly. After a few minutes of warning, the light system will fail to low brightness mode and the red switch will flash. With healthy (but depleted) rechargeable batteries, this "limp home" mode can last quite a while, but the LED will eventually dim and fade out. On a totally dark road or bicycle path, you will want to ride slowly and cautiously if the light switches to reserve power.

Run time
I started hunting for another light setup when I realized that 90 minutes of run-time from my halogen rig wasn't going to cut it. I'd say that the DiNotte's run-time for the amount of light it offers was the biggest selling point for me. Although it might only be a few times per month, there are occasions where I may be riding in the dark for 3-4 hours in a single day.
From a set of 2000mA NiMH Rechargeable AA cells, expect about 3 hours of use at full brightness, 4-8 hours on the medium steady and blinking modes, and an astonishing 12 hours or so (not tested) if using only the low light mode.
The LED element in the DiNotte 200L draws some serious current. Inexpensive LED lights claim run-times as long as 20 hours on four AA batteries, so 3 hours is quite a drain. Those amps have to go somewhere, and inevitably, there's quite a bit of heat being created to go with the light. The light engine's casing acts as a heat sink for the LED. Indeed, the case gets hot if left on without airflow around it. That pattern in the metal isn't just for looks -- it's a radiator!

Light output and comparison
When I was on some of the longer night-time rides, I was forced to use my old Blackburn Quadrant as my only source of light. It works fine as a "to be seen" light, but does little to warn of obstacles in the path before you. The DiNotte is the answer to my problem of having enough light to see with while not compromising run time.
I'd say that the light output of the DiNotte 200L on its highest setting is about equal to my NiteRider with the original 10W bulb (which burned out with about 3 months of daily use) To compare my NiteRider Evolution 10W side by side with the Dinotte:

Since the halogen bulb burned out in my NiteRider, I switched to an aftermarket 15 watt bulb which reduced run time by almost an hour. The modified NiteRider is considerably brighter, with a much tighter spot light effect, but a broader flood than the DiNotte. If seeing down the road at all costs is the objective, the 15W halogen bulb wins. The DiNotte beam is on the left, 15W Halogen is on the right.


If you run the two at the same time, you essentially have broad daylight at your disposal:


During the morning and evening twilight hours, the DiNotte's strobing patterns are extremely vivid and hard to ignore. I would almost call it annoying. Reflective street signs blink back at me, even with the sun in the sky. Now, even during the day, I don't commute without the DiNotte flashing away.
LED lighting has come a long way in the last few years. It used to be that LED lights were only "okay" to be seen by. The new advances in LED technology have brought us to a point where a lot of usable light and some good run-time can be squeezed from LED-based solutions.
Overall, I think that halogens still have a solid hold on the title of "best bang for the buck" simply because halogen setups are so inexpensive. They can be over-volted, bulbs are cheap and require no extra circuitry, but the only way to get a long burn out of halogen is to carry around a bulky battery pack. The more light you want, the more batteries you'll have to carry.
With the DiNotte, I can have the batteries hooked up to the light, then carry one spare battery clip full of freshly-charged cells in a pocket somewhere, and get 6 full hours of light that's on par with a 10W halogen setup. The cost is a little higher, but I think the payoff is worth it in the long run if you don't need more light than the 200L will put out.
The DiNotte 200L-AA-S kit (most similar to what I purchased) can be found here:
http://store.dinottelighting.com/Product2
It includes all that's shown above, plus 4 NiMH AA cells, a battery charger, and helmet mount kit. Retail price: $169.
Tuesday, May 22, 2007
Product Review: Banjo Brothers Saddlebag Panniers
 I put a bit more thought and research into panniers than I did with the rack they sit on. Panniers come in all kinds of different kinds, shapes, sizes, and purposes. In general, most rear racks designed to carry panniers all have very similar dimensions. The panniers themselves, though? That's a different story! With many models to choose from, I had to look at dozens of different models, and narrow my choices down to about 3 models before purchasing anything.
 I needed a set of panniers that would be able to carry my laptop bag, cable lock, work clothes, rain jacket, cell phone, and other gadgets. I also needed the panniers to be easy to remove and install, because I planned on taking them off the bike when I get to work. Furthermore, and most importantly, I needed them to not get in my way. Big panniers can hold a lot of stuff, but it doesn't do any good if your foot hits the bag with every pedal rotation.
  Those were all "musts" on my list of features. I wanted something with reflective material (not hard to find, almost all the models I considered had this) as well as good water resistance. I don't need waterproof panniers, but they shouldn't turn into buckets of water when it rains. I also wanted something under the $60 price-point but was willing to pay more if the right deal came along.
As you can see, I definitelty found something with reflective material. :) These saddlebag panniers attach to the "hooks" on the rack with a metal loop. The loop is attached to a nylon strap that goes up to the top of the bag, across the rack, and down the other side. There are pieces of elastic band that give the panniers' hook loop some stretch to make installation and/or removal a bit easier, while staying firmly on the rack. You can cinch these straps down with the adjuster on the top of the rack.
The inside (wheel facing) part of the saddlebags are lined with a hard plastic piece. The whole inner surface of the bag is lined with a rubbery water-resistant covering, and the zippers are covered when closed properly. Banjo Brothers says these saddlebags are water resistant but not waterproof. They've been through a few light rains and nothing has gotten damp inside yet. The only gripe I have about these bags, is that if the load shifts inside the bag, it has a tendency to "poof" outward a bit. This is unsightly, inefficient and annoying. I have considered cutting out a chunk of corrugated plastic to make the outer wall just as sturdy as the wheel-facing inner wall. I think this would not only improve their aesthetics when carrying a bunch of stuff, but would also make it easier to "layer" things to stay more organized inside. It might reduce storage capacity just a little, though.
Overall, at about $50, I don't think I could have done any better. I shopped around at a lot of stores and saw a bunch of really nifty options for panniers. For my purposes, these fit the bill perfectly.
Update: I've had to get the seams re-stitched on the top part that joins the two bags together. This is almost certainly from carrying frequent loads that are probably heavier than these were designed to hold. If you're packing light stuff like clothes or a lunch, loading them full isn't much of a problem. When you pack denser items, you probably shouldn't fill them all the way up.
Pros:
* Competitively priced
* Durable
* Compact enough to stay out of the way
* Big enough to carry quite a load
* Water resistant
* Reflective!
Cons:
* Might be a little too big for some peoples' comfort or needs
* Cheaper options are out there
* Have a tendency to deform when loaded with a lot of stuff
* If heavily loaded too often, the seams get weak and need re-stitching
Product Review: Blackburn Cross Rack
 When I purchased my Trek 1200, I knew right off the bat that I'd need a cargo rack to carry my gear. There were a few brands and models to choose from, but I'll admit that I got this strictly based on price compared to competing products. I actually had this rack installed before I even bought my bike. The bike shop did manage to twist the head off of one of the hex bolts that came with the kit, and it wasn't due to cross-threading. Installation was apparently a breeze, but the rack's frame required cold setting (read: "needed to be bent outward") in order to attach to the braze-on points on my rear dropouts.
There were two models that looked identical from Blackburn. The Cross Rack and the Mountain Rack. The mountain version had a black piece of sheetmetal forming the rack's ledge, and the cross version had a shiny silver piece of sheetmetal instead. Since my bike is black and silver, I chose the black and silver one, plain and simple.
The features I was looking for were braze-on mounting, tie-downs, and hooks at the bottom for attaching panniers or bungees. As it turns out, none of the racks I saw at the local bike shops had all three of these features. The seat-post mounted racks had tie downs but they lacked the frame or hooks to attach panniers to. The braze-on attachment racks all had hooks for panniers, but no built-in elastic tie-towns or bungees. Such is life.
I dealt with the rack (and some small bungees) for a few weeks without panniers. Overall, this rack carries a heavy load very well. I've loaded it down with groceries, all of my work gear, and plenty of other stuff. It seems to be able to support at least 30 pounds without any problems. My guess is that it could handle even more.
You can see I wrapped the frame with reflective black tape and placed a standard DOT reflector on the back of the rack. This is mostly just for some extra reflection when I don't have panniers on.
Pros:
* Affordable
* Carries plenty of weight
* Attaches firmly to frame (if you have braze-on holes on your frame)
* Has built-in hooks to attach panniers or bungees for carrying even more stuff
* Drilled-out mounting bracket for rear reflector or blinking light (with some creative mounting)
Cons:
* Not exactly a work of art
* May ship with mediocre bolts and fasteners
* No built-in tie downs, bring your own bungees!
* Requires some bending to make it fit standard rear drop-out braze-on points
Subscribe to:
Posts (Atom)
